Accessing the Cluster
A general guide for accessing the DTU clusters through the so-called login nodes can be found here. We go through examples using PuTTY for accessing these nodes below.
Note that you should not transfer large files via the login nodes (e.g. login.gbar.dtu.dk), but through the transfer nodes (e.g. transfer.gbar.dtu.dk). A general guide exists for transferring files to and from the cluster, and we provided an example of how to access the transfer node using WinSCP below.
Warning
Remember to be on a DTU network, either by physically being at DTU or through a VPN, such as Cisco VPN.
Do not transfer large files or run resource intensive programs directly on the login nodes!
See WinSCP Example for how to transfer large files and Job Submission for submitting resource intensive programs.
PuTTY Example
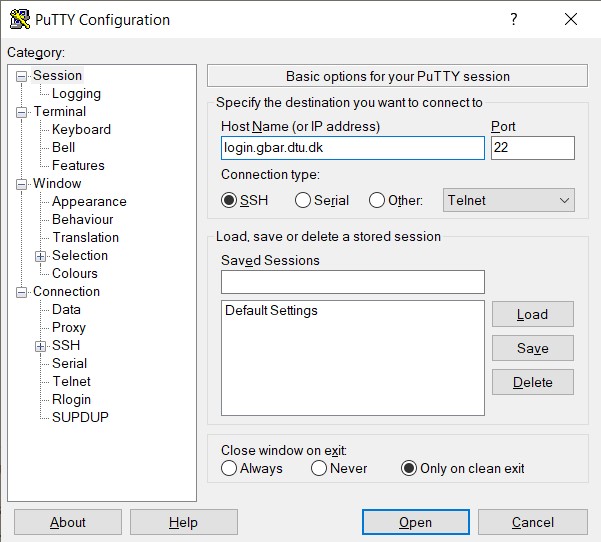
We will use PuTTY to explain how to submit jobs. When starting PuTTY, a graphical user interface (GUI) appears as illustrated in the Figure below.

The graphical user interface that appears when starting up PuTTY.
Type login.gbar.dtu.dk as the host-name and enter. This results in a command prompt that asks for your username, see the code snippet below. Write your DTU initials or student number. This is followed by a password prompt. Note that it does not show your password as you type it for security purposes, but your keystrokes are being registered. Type your DTU password confidently and press enter. You can also (in Windows) copy your password and paste it into the password prompt with shift + enter (not ctrl + V).
login as: user_name
user_name@login.gbar.dtu.dk's password:
WinSCP Example
When you open WinSCP, the GUI illustrated in the Figure below will appear. Type your user name followed by @transfer.gbar.dtu.dk in the “Host name” form and press enter. Once again, you will need to write your DTU password. You will then enter the main WinSCP GUI, where you can browse local files in the left window and HPC files in the right window. Files can be transferred by dragging and dropping between the two windows.

The graphical user interface that appears when starting up WinSCP.