Creating a copy of the repository by “forking” and/or “cloning”
A repository is a collection of files in one directory tracked by Git. A GitHub repository is GitHub’s copy, which adds things like access control, issue tracking, and discussions. Each GitHub repository is owned by a user or organization, who controls access.
For Balmorel we have mainly two of these repositories:
https://github.com/balmorelcommunity/Balmorel, which contains the framework, e.g. mathematical formulations and addons.
https://github.com/balmorelcommunity/Balmorel_data, which contains all the data needed to run the model.
To start, we need to make our own copy of these repositories and transfer them to our own Computer or the HPC.
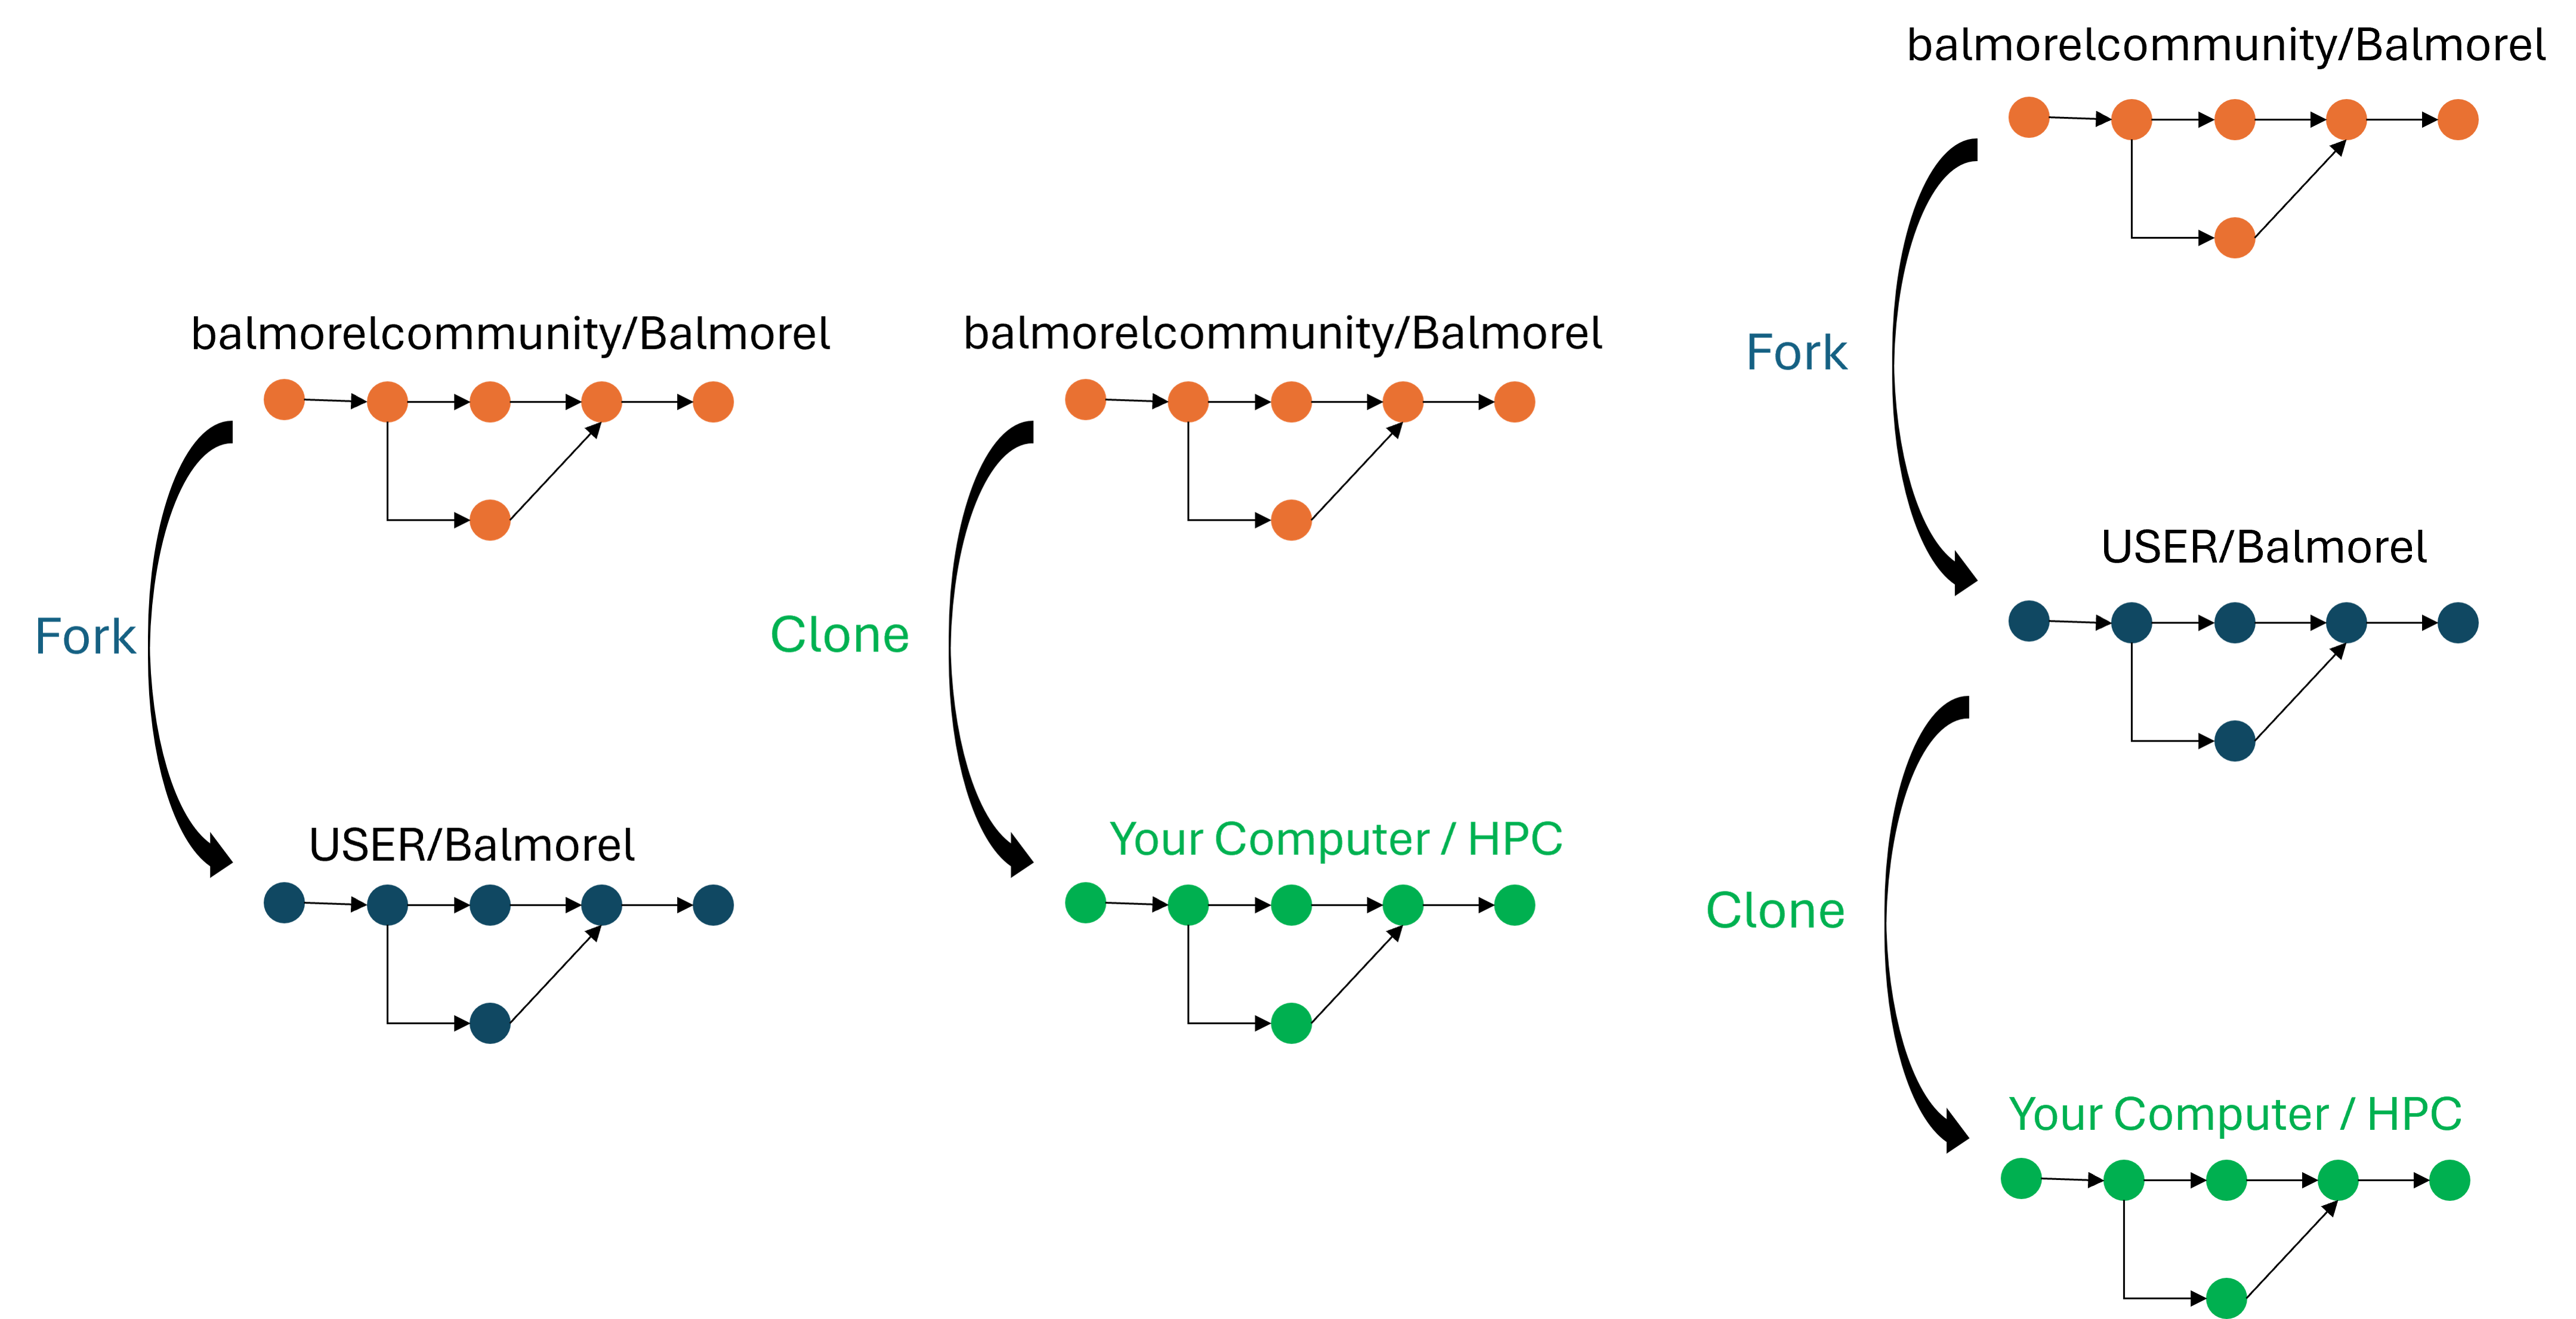
Illustration of the concepts of forking and cloning and the recommended workflow for Balmorel: forking then cloning.
At all times you should be aware of if you are looking at your repository or the upstream repository (original repository):
Your repository: https://github.com/USER/Balmorel
Upstream repository: https://github.com/balmorelcommunity/Balmorel
How to create a fork
Go to the repository view on GitHub: https://github.com/balmorelcommunity/Balmorel
First, on GitHub, click the button that says “Fork”. It is towards the top-right of the screen.
You should shortly be redirected to your copy of the repository USER/Balmorel.
Repeat the same step for the https://github.com/balmorelcommunity/Balmorel_data repository.
Exercise: Copy (clone) the repositories and setup the correct folder structure
Work on this by yourself or in pairs.
Exercise preparation
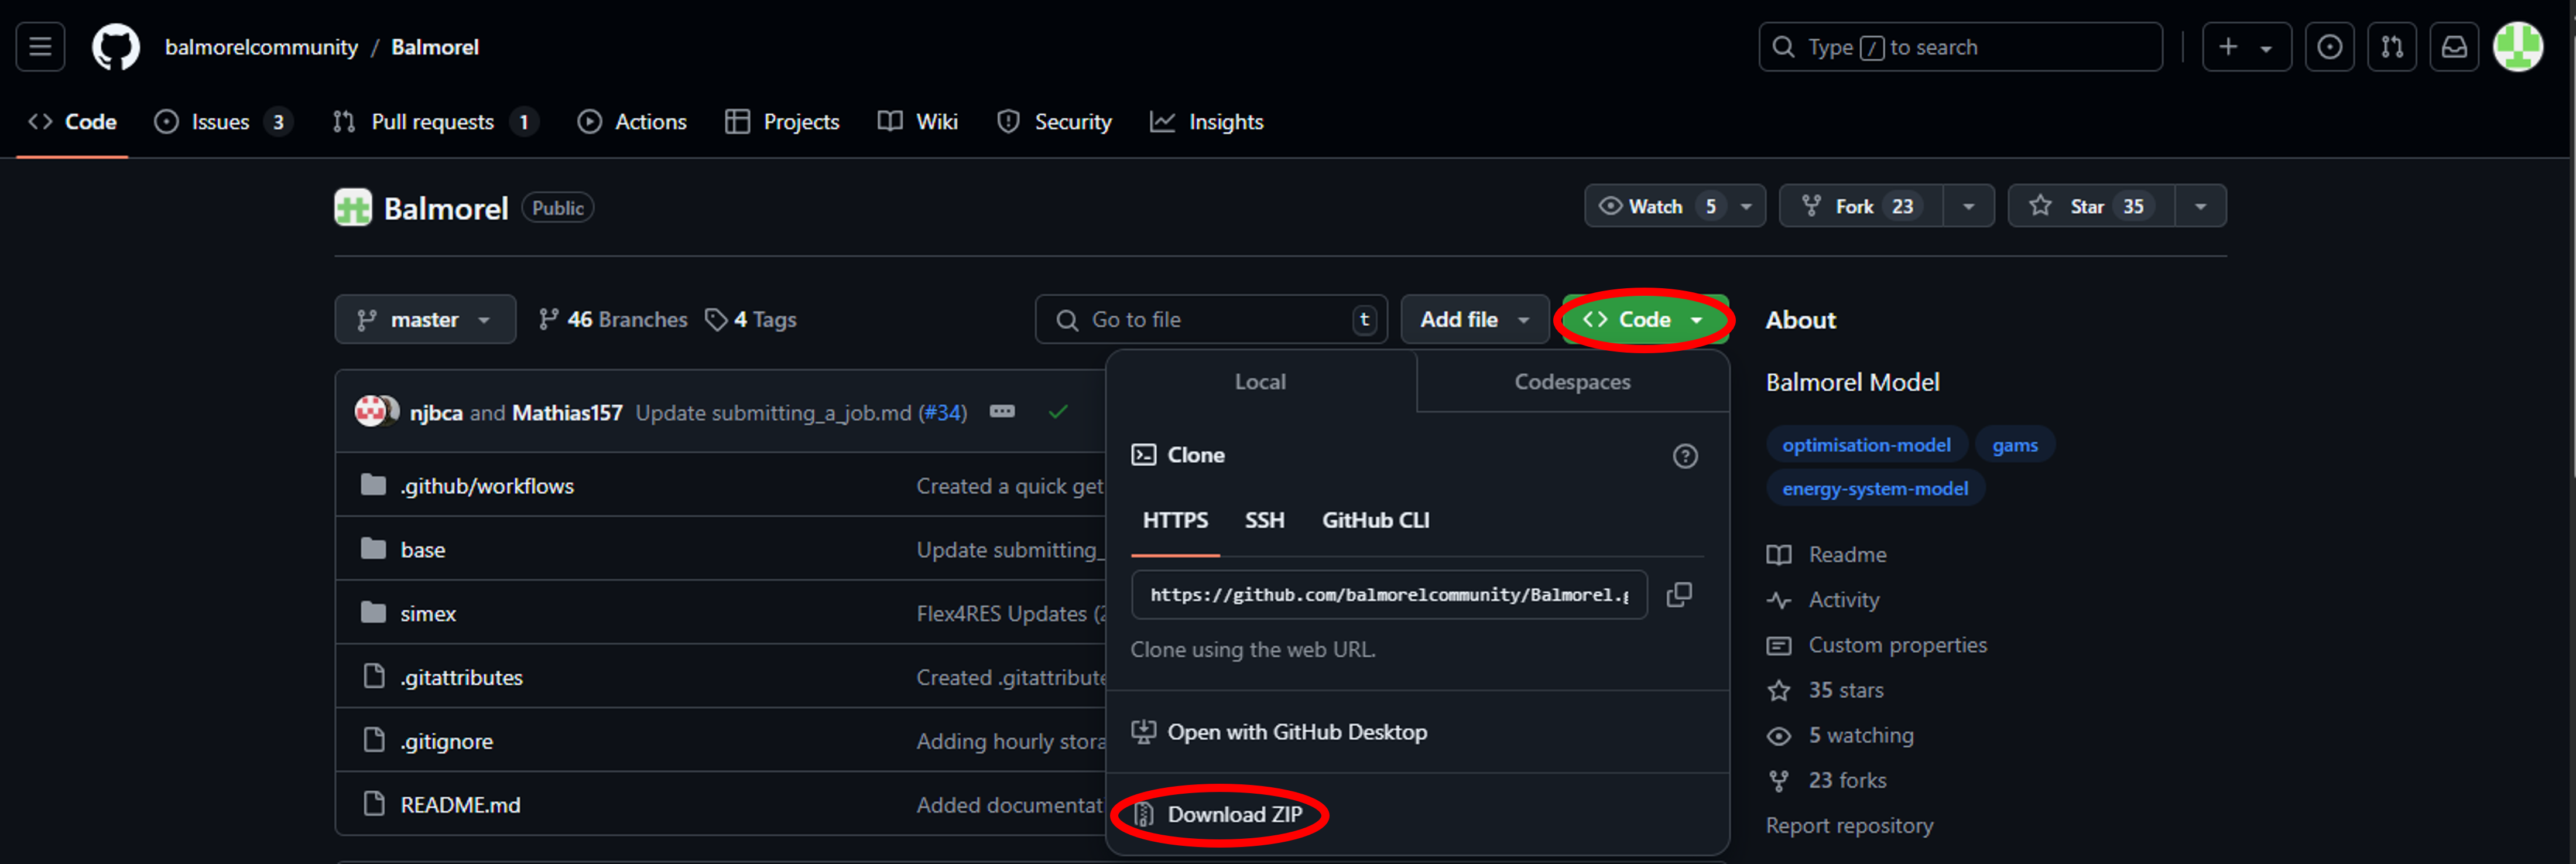
In this case you will download the repositories as a .zip file from GitHub:
Go to the Balmorel GitHub repository.
Make sure the URL says
https://github.com/USER/Balmorel, whereUSERis your username.Download the repository:
Extract the folder to a location of your choice.
Download the
https://github.com/USER/Balmorel_datarepository the same way (Make sure you are cloning your forked repository).Extract the files into the local copy of the Balmorel repository, into the base folder.
Rename the
Balmorel_datafolder todata.
You need to have forked the repository as described above.
We need to start by making a clone of this repository so that you can work locally.
Start VS Code.
If you don’t have the default view (you already have a project open), go to File → New Window.
Under “Start” on the screen, select “Clone Git Repository…”. Alternatively navigate to the “Source Control” tab on the left sidebar and click on the “Clone Repository” button.
Paste in this URL:
https://github.com/USER/Balmorel, whereUSERis your username. You can copy this from the browser.Browse and select the folder in which you want to clone the repository.
Say yes, you want to open this repository.
Select “Yes, I trust the authors” (the other option works too).
Repeat the same process for
https://github.com/USER/Balmorel_datauntil you have to choose the location.Select the
.../Balmorel/and clone the data to this location.Rename the
Balmorel_datafolder todata.
This path is advanced and we do not include all command line information: you need to be somewhat comfortable with the command line already.
You need to have forked the repository as described above.
We need to start by making a clone of this repository so that you can work locally.
Start the terminal in which you use Git (terminal application, or Git Bash).
Change to the directory where you would want the repository to be (
cd ~/codefor example, if the~/codedirectory is where you store your files).Run the following command:
git clone https://github.com/USER/Balmorel, whereUSERis your username. You might need to use a SSH clone command instead of HTTPS, depending on your setup.Change to that directory:
cd BalmorelRun the following command:
git clone https://github.com/USER/Balmorel_data, whereUSERis your username.Rename the
Balmorel_datafolder todataby typing the following command:mv Balmorel_data data.
Exercise: Browsing and editing the repositories (10 min)
Browse the Balmorel repository either on GitHub or your local PC and explore commits and branches. Take notes and prepare questions. The hints are for the GitHub path in the browser.
Browse the commit history: Are commit messages understandable? (Hint: “Commit history”, the timeline symbol, above the file list)
Try to find the history of commits for a single file, e.g.
base/output/OUTPUT_SUMMARY.inc. (Hint: “History” button in the file view)Which files creates the MainResults.gdx file? (Hint: the GitHub search on top of the repository view, look for
execute_unload "MainResults.gdx")In the
base/output/OUTPUT_SUMMARY.incfile, find out when the parameterSTORAGE_LEVELwas added and in which commit. (Hint: “Blame” view in the file view)
The solution below goes over most of the answers, and you are encouraged to use it when the hints aren’t enough - this is by design.
Solution and walk-through now
(1) Basic browsing
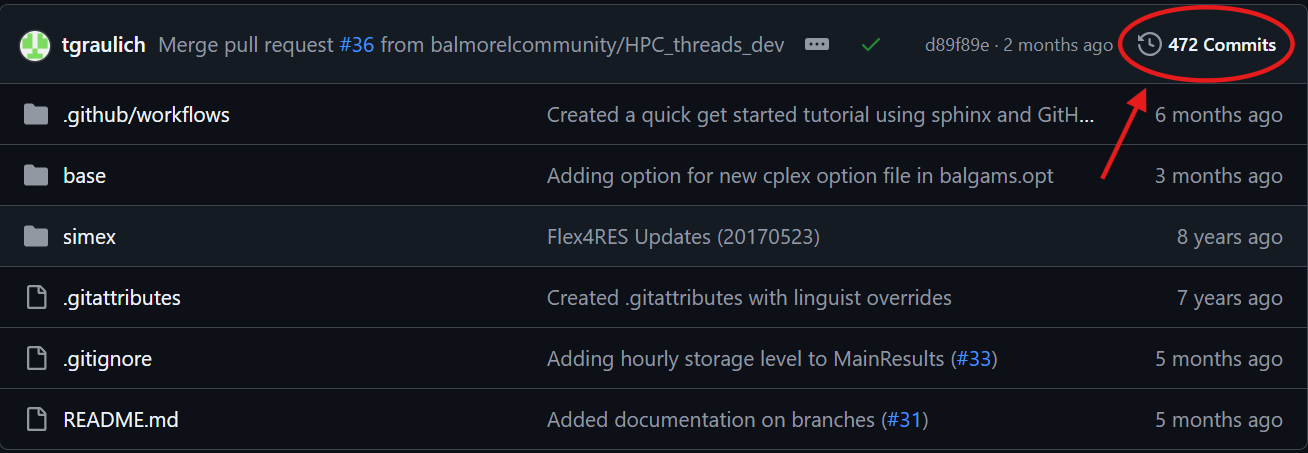
The most basic thing to look at is the history of commits.
This is visible from a button in the repository view. We see every change, when, and who has committed.
Every change has a unique identifier, such as
244c993. This can be used to identify both this change, and the whole project’s version as of that change.Clicking on a change in the view shows more.
Click on the timeline symbol in the repository view:
This can be done from “Timeline”, in the bottom of explorer, but only for a single file.
Run:
$ git log
Try also:
$ git log --oneline
(2) How can you browse the history of a single file?
We see the history for the whole repository, but we can also see it for a single file.
Navigate to the file view: Main page → /base/output/OUTPUT_SUMMARY.inc.
Click the “History” button near the top right.
Open OUTPUT_SUMMARY.inc file in the editor. Under the file browser,
we see a “Timeline” view there.
The git log command can take a filename and provide the log of only
a single file:
$ git log OUTPUT_SUMMARY.inc
(3) Which files creates the MainResults.gdx file?
Version control makes it very easy to find all occurrences of a word or pattern. This is useful for things like finding where functions or variables are defined or used.
We go to the main file view. We click the Search magnifying
class at the very top, type execute_unload "MainResults.gdx", and click enter. We see every
instance, including the context.
Searching in a forked repository will not work instantaneously!
It usually takes a few minutes before one can search for keywords in a forked repository since it first needs to build the search index the very first time we search. Start it, continue with other steps, then come back to this.
If you use the “Search” magnifying class on the left sidebar, and search for “position” it shows the occurrences in every file. You can click to see the usage in context.
grep is the command line tool that searches for lines matching a term
$ git grep 'execute_unload \"MainResults.gdx\"'          # only the lines
$ git grep -C 3 'execute_unload \"MainResults.gdx\"'     # three lines of context
$ git grep -i 'execute_unload \"MainResults.gdx\"'       # case insensitive
(4) In the base/output/OUTPUT_SUMMARY.inc file, find out when the parameter STORAGE_LEVEL was added and in which commit.
This is called the “annotate” or “blame” view. The name “blame” is very unfortunate, but it is the standard term for historical reasons for this functionality and it is not meant to blame anyone.
From a file view, change preview to “Blame” towards the top-left. To get the actual commit, click on the commit message next to the code line that you are interested in.
This requires an extension. We recommend for now you use the command line version, after opening a terminal.
These two commands are similar but have slightly different output.
$ git annotate base/output/OUTPUT_SUMMARY.inc
$ git blame base/output/OUTPUT_SUMMARY.inc